Monogrammed T-Shirts
Making and Using a Freezer Paper Stencil
This was my first experience with freezer paper and I am HOOKED!
I was inspired to try this stenciling method by Dana at Dana Made It. She has the amazing ability to make anything crafty look fun & easy! And by Kasey the Stay at Home Artist who made a unique Harry Potter Tee (I have a huge weakness for everything HP ever since my 8 year old became an avid reader courtesy of J.K. Rowling!)
So, I had the rumblings of Freezer paper stencil ideas in the back of my head...
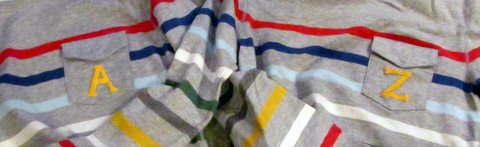
when I came upon these adorable T-shirts.
I like to dress my twins in coordinating outfits - matching but not identical (so I can ID them more quickly!) So, when I purchase new clothes for them, I usually look for the same item in different colors. This shirt only came in one color, but it was too cute (and cheap ;-) to leave behind. Hmmm...
That's when it hit me...put a little monogram on the pocket...using Freezer Paper Stencils!
It's a win - win. The kids get the cute shirts, and Mom gets to try a new project!!!
Here's what you need...
1. a shirt
2. freezer paper
3. sharpie pen
4. x-acto knife
5. iron
6. fabric paint and a paintbrush
7. cardboard
Here's how I did it...
I cut out a piece of freezer paper the size of the pocket where the monogram would go.
On my computer, I typed the letters for the monogram in a font that I liked (and that I thought would be easy to cut out). I held the freezer paper piece up to the screen and enlarged the font until it was the right size. Then I simply traced the letter from the screen onto the freezer paper (gently, using a SOFT TIPPED marker like a sharpie - don't damage your screen). You could always print out the monogram first and then trace it, but that's an extra step!
I then used my x-acto knife to carefully cut out the letter (using the cardboard to protect my counter). Start with the "inside" pieces, like the triangle in the middle of the A - IMPORTANT, save those pieces. Then cut the outside borders.
After the letter is cut out, place the stencil on the shirt and iron it into place. Then fit in those little inside pieces you saved and iron them on too.
Place the cardboard inside the shirt to prevent paint from bleeding through.
Apply the paint being careful not to push any paint under the edges of the stencil (I used more of a dabbing motion and was really careful to move the paintbrush from the stencil toward the shirt - a bit tricky with such a small stencil, but do-able.)
 Let the paint dry and apply a second coat if needed.
Peel off your stencil.
Set the paint using the instructions on the bottle. I used a flocked paint so it needed to be steamed to puff up the flocking and set the paint.
Voila!
Proudly display your shirt on the cutest models you can find...
even if they won't hold still for one good photo!
I am definitely adding Freezer Paper Stencils to the list of crafts I'm addicted to!
Let the paint dry and apply a second coat if needed.
Peel off your stencil.
Set the paint using the instructions on the bottle. I used a flocked paint so it needed to be steamed to puff up the flocking and set the paint.
Voila!
Proudly display your shirt on the cutest models you can find...
even if they won't hold still for one good photo!
I am definitely adding Freezer Paper Stencils to the list of crafts I'm addicted to!
I'm partying at...


Thanks for stopping by, I'll be right over!
ReplyDeleteThose are some adorable models!!! I had no idea that freezer paper would iron on so you could use it as a stencil. Thanks for the great tutorial!!!
ReplyDeleteI keep thinking I'm going to finally break down and get some freezer paper and create something but I never do it. Maybe if I had cute models like you I'd be more motivated :)
ReplyDeleteI'd be happy to lend them to you...say on a Friday or Saturday evening...while I go out to a civilized, grown-ups only dinner...You know, just to motivate you...I'm only thinking of YOU here...because I'm nice like that {wink}!
DeleteFirst of all, your boys are adorable! I just tried this technique over the weekend on some onesies and it's amazing how well it worked. I'd love it if you shared this at Whimsy Wednesdays at www.thenymelrosefamily.blogspot.com/2012/03/whimsy-wednesdays-2.html. I'm following via LF.
ReplyDeleteThis is too cute! Thanks for linking up at my Linky Party via: www.ourdelightfulhome.blogspot.com
ReplyDeleteMrs. Delightful
www.ourdelightfulhome.blogspot.com
Cute idea! They are adorable too :)
ReplyDeleteThanks all! Your sweet comments make this blogging thing so much fun!
ReplyDeleteThis is a great idea! The yellow works perfectly with the shirt too. Thanks for sharing at Terrific Tuesdays.
ReplyDeleteRachel
adventuresofadiymom.blogspot.com
Great idea! Those guys are so cute!
ReplyDelete--Katie
@ Creatively Living
I'm so glad you shared these at Whimsy Wednesdays at The NY Melrose Family. I look forward to seeing what you'll share this week.
ReplyDeleteLove the concept of yours.this has been an great idea i love to know about kids clothing..these kids looks so cutie in these t-shirts.
ReplyDelete