What I've been up to lately...

Monday, January 30, 2012

From Art to Shirt

The Snowman
Rowan drew a picture of a snowman the other day...
Then he asked if I could "turn it into a shirt" so he could wear his snowman picture.
Hmmm......
Sure!
This adorable snowman picture:
became...
...this cute shirt!
Rowan made a few adjustments to his original design.  He wanted a carrot nose...green eyes...and a hat,
"the snowman kind."
I think he's happy with the result!
I am too!


Pin It

Wednesday, January 25, 2012

One Day of Winter

Winter has finally arrived.
Finally.
Rowan couldn't wait any longer for snow.
Last year, in New Jersey, we were buried under several feet of the white stuff by mid January.
This year is different.  Aside from some wacky pre-Halloween snow, we hadn't gotten an inch...
...until Saturday.  The boys woke to find a glistening white surprise outside their window.
We ended up with about 3 inches.  A perfect amount to play in...
...and eat...
...Mmmm, New York snow!
Tasty!
It stuck around for about a day...
And then it was gone.
Now we're back to springtime in January.
How has this winter been treating you?

Saturday, January 21, 2012

Caught; Red handed!

Well, Plum Wine handed (and faced), to be precise.

What's worse than one toddler who gets into your lipstick?
Two toddlers who conspire and paint each other.
I must admit boys, I'm flattered that you want to be just like Mommy.
But is that really how Mommy looks when she puts on her make-up???
Perhaps it's time for a professional make-up consultation...
As soon as I finish cleaning the lipstick off of the kitchen floor!
p.s.-note how remorseful they look that they destroyed my favorite lipstick☺

Friday, January 20, 2012

Chocolate Dipped Pretzels

Spicy...

or Sweet???
Looking for a great treat?  These are quick, easy and sure to impress!
I usually make these for Christmas giving...but there must be a Valentine out there that deserves some of this deliciousness!
Spice things up a bit by topping a sweet and salty chocolate covered pretzel with just a touch of fiery cayenne!
Wait a minute.  Did she say cayenne?
As in "burn my mouth off Cayenne Pepper?"  
On candy?!?!?
Yup, that's right!  Just a touch of cayenne adds a warmth and complexity to the chocolate that will bring rave reviews, without singeing any tongues.
Not ready for such culinary daring?   
Keep it sweet with fun sprinkles!
What you need:
Bag of mini pretzels (I find Snyder of Hanover to have very few broken pretzels in their bags!)
Chocolate candy melts (I prefer Wilton Dark Cocoa)
Cayenne pepper and/or sprinkles
Tip: have everything set up and on hand so that once your chocolate is melted, you can proceed without interruption.


Get your pretzels ready by sorting out any broken pieces.  Lay out either waxed paper or aluminum foil to place the pretzels on after dipping (on a baking sheet if they will need to be moved before the chocolate sets).  


Melt the chocolate melts in a microwave safe bowl by following the package directions for your melts.  (I melt Wilton melts *always on 50% power* for 1 minute then mix, 30 seconds then mix, 20 seconds then mix, then in 10 second increments until chocolate is mostly smooth with a few lumps.  The warm chocolate will melt the lumps as you mix it.)  
Continue to mix until chocolate is smooth and shiny. Like this:
Dip each pretzel into the chocolate.  I use one of the top "loops" as a handle.  Let any extra chocolate drip off, sometimes a little gentle shaking encourages those drips to fall.
Spicy: Lay the pretzel on the foil.   After dipping 3 pretzels, sprinkle lightly with cayenne pepper.  Continue dipping in sets of 3 (so the chocolate doesn't set before you sprinkle the cayenne.)
You may have to remelt the chocolate if it starts to get clumpy or thick.  Remelt for 10 seconds on 50% power mix, repeat if necessary.
Let pretzels sit until chocolate has set (usually 5-10 minutes).  
Always taste test before sharing...just to make sure you weren't too generous with the cayenne!


Sweet: After dipping in the chocolate, dip each pretzel into sprinkles.

Lay each sprinkled pretzel on the foil and allow to set.
Stand guard to keep pretzel thieves away...
at least until the chocolate sets!

Pin It

Wednesday, January 18, 2012

TUTORIAL: Finishing and securing a magic crochet ring

When finishing a piece, I always hide any ends using a tapestry needle.  I love neatly finished crochet when you can't tell where things are joined or where the stitching began or ended.  With a magic circle, I prefer to secure the tail before hiding it, to ensure that there will be no unraveling.  
Here is how I do it:
Working on the back (or inside) of the piece, I push my crochet hook under the stitch just to the right of the tail.
Hook the tail and pull through to form a loop.
Work a slip stitch and pull the tail all the way through.
Tighten this stitch and your magic ring is secure.  You can then use a tapestry need to hide the tail.
Magical and secure.  Tidy on the back or inside...
as well as on the front or outside!

Tuesday, January 17, 2012

TUTORIAL: "Magic" ring - Adjustable crochet circle

All of my hats and flowers start with a little magic...
a magic adjustable ring that is!
This is the best, most useful crochet technique
I have ever learned.
For anyone who likes to crochet in the round this is life altering.  No more gaping, saggy holes at the center of your work...no more wonky, loose first stitches. 

You could argue that there may still be reasons to chain 3 and join to make a ring or make a ring by crocheting into the first chain...but since I discovered the magic ring,
I haven't looked back.

I would love to share this magic with you today and hopefully change your crocheting forever!
Here we go...
Hold the yarn between your left thumb and index finger leaving a 2-3  inch tail (lefties use right hand).
Wrap the yarn around your middle and index finger and catch it under your thumb to form a ring.
Slip your middle finger out of the ring.  You should then have the ring held between your thumb and index finger.
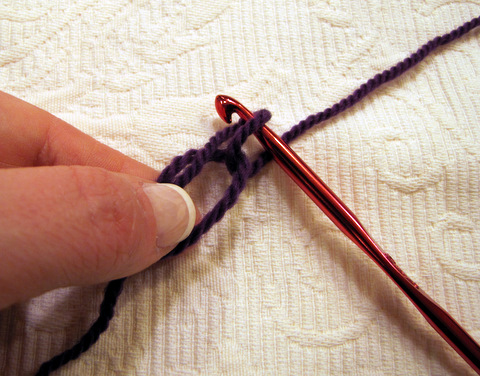
Insert your crochet hook at the top of the ring.
Catch the working end of the yarn and pull through the ring to create your first working loop.
Chain 3 (if your first row will be double crochet,
chain 2 for half-double crochet, chain 1 single crochet).
I'm using double crochets for this ring.
From this point, you will work stitches into the ring (working over the tail).
Work as many double crochets as your pattern calls for.  I've done 12.
While holding your work in your right hand, grasp the tail with your left hand and pull to form a tight circle.
Join into the last stitch of your initial chain.
Magic! Isn't it the most beautiful little circle you've ever seen?!?!
Hooray for the magic adjustable crochet ring!
Check back tomorrow for a quick tutorial on finishing and securing the ring!


Pin It
Related Posts Plugin for WordPress, Blogger...