What I've been up to lately...

Tuesday, January 17, 2012

TUTORIAL: "Magic" ring - Adjustable crochet circle

All of my hats and flowers start with a little magic...
a magic adjustable ring that is!
This is the best, most useful crochet technique
I have ever learned.
For anyone who likes to crochet in the round this is life altering.  No more gaping, saggy holes at the center of your work...no more wonky, loose first stitches. 

You could argue that there may still be reasons to chain 3 and join to make a ring or make a ring by crocheting into the first chain...but since I discovered the magic ring,
I haven't looked back.

I would love to share this magic with you today and hopefully change your crocheting forever!
Here we go...
Hold the yarn between your left thumb and index finger leaving a 2-3  inch tail (lefties use right hand).
Wrap the yarn around your middle and index finger and catch it under your thumb to form a ring.
Slip your middle finger out of the ring.  You should then have the ring held between your thumb and index finger.
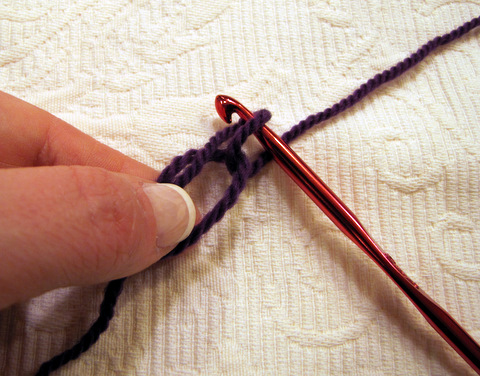
Insert your crochet hook at the top of the ring.
Catch the working end of the yarn and pull through the ring to create your first working loop.
Chain 3 (if your first row will be double crochet,
chain 2 for half-double crochet, chain 1 single crochet).
I'm using double crochets for this ring.
From this point, you will work stitches into the ring (working over the tail).
Work as many double crochets as your pattern calls for.  I've done 12.
While holding your work in your right hand, grasp the tail with your left hand and pull to form a tight circle.
Join into the last stitch of your initial chain.
Magic! Isn't it the most beautiful little circle you've ever seen?!?!
Hooray for the magic adjustable crochet ring!
Check back tomorrow for a quick tutorial on finishing and securing the ring!


Pin It

Saturday, January 14, 2012

2 x 2: Twin Second Birthday Cakes

My idea for Avery and Zander's birthday cakes this year was to make them each their own cake with a modern art theme since we were having their birthday party at the Long Island Children's Museum. 

The inspiration for Zander's cake came from the painting Colour Study: Squares with Concentric Circles by Wassily Kandinsky. 
I designed Avery's cake by rearranging rows of circles and stripes of varying widths until I was happy with the result.  I also added a section of randomly arranged "2"s.
My favorite part of the cakes are those little #2s!
I topped each cake with a cupcake frosted with white cream cheese frosting and decorated with the boys' names spelled out in fondant letters.
After we sang "Happy Birthday" and they blew out the candles, each birthday boy got his own cupcake.
What fun it was to watch them devour those cupcakes 
(letters first, then icing, then finally cake)!
Serious fun...try not to smile!
Happy 2nd Birthday Avery and Zander!
p.s.- Avery's cake was red velvet with strawberry filling and Zander's was vanilla almond with black raspberry filling.  Both had cream cheese frosting and were decorated with fondant.  
Yummy!

p.p.s.-These beautiful photos were taken by Ben Hill, owner of Teeny Pixel. www.teenypixel.com

Pin It

Monday, January 9, 2012

Happy New Year 2012

May the new year be filled with...

friendly greetings,

new discoveries,

silliness,

thrilling adventures,

warm family memories,

and dreams come true!

Happy New Year!

What do you wish for in the year to come?
Related Posts Plugin for WordPress, Blogger...